Pumpkin Stencil Joker: Carve a Villainous Grin
A pumpkin stencil joker design is one of the most recognizable Halloween carvings you can make. With its wide grin, sharp teeth, and theatrical expression, the Joker transforms an ordinary pumpkin into a piece of pop-culture art that lights up a porch like no ordinary jack-o'-lantern. Whether you are a comic book fan, a movie buff, or simply love a villainous grin, this guide will walk you through choosing the right stencil, preparing your pumpkin, carving cleanly, and making the final result look dramatic after dark.

Why a Joker Pumpkin Stencil Works So Well
The Joker has been a Halloween favorite for decades because his face is essentially already a mask. The exaggerated lips, the arched brows, and the slightly off-kilter eyes translate beautifully onto the curved surface of a pumpkin. Unlike a simple triangle-eyed jack-o'-lantern, a Joker design tells a story. Neighbors walking past your door will recognize him instantly, and the carved face casts a wonderfully sinister shadow when a candle or LED flickers inside.
Another reason pumpkin stencil joker templates are popular is their flexibility. You can go full Heath Ledger chaos, lean into Jack Nicholson's manic grin, or use the stylized comic book look with bright green accents painted on the rind. The same basic stencil can be dressed up or down depending on how much time you have and how bold you want the result to be.
Choosing the Right Pumpkin Stencil Joker Template
Before you touch a carving tool, spend a few minutes picking the right template. The difference between a clean, recognizable Joker and a lumpy mess usually comes down to this step.
Free vs. Paid Stencils
Free templates are plentiful on sites like Pinterest, Reddit's r/Halloween, and dedicated pumpkin carving blogs. They range from simple line-art grins to multi-page full-face designs. Paid templates on Etsy or DesignCuts tend to be more detailed and often include a couple of skill levels so you can pick a beginner or advanced version. For your first Joker, a low-to-medium complexity stencil with bold shapes works best.
Skill Level Matching
- Beginner: Choose a stencil with large connected shapes, minimal hair detail, and chunky teeth. These carve quickly and forgive small mistakes.
- Intermediate: Look for templates that add hair lines, eye texture, or a defined collar. Plan on 60 to 90 minutes of carving.
- Advanced: Multi-layer designs with shading, tiny pupils, and intricate scar lines. Budget two to three hours and use a serrated knife detail tool.
Sizing the Stencil to Your Pumpkin
Measure the width and height of your pumpkin before printing. Most stencils are designed for a medium 8 to 10 inch face. If your pumpkin is larger or smaller, scale the print up or down so the Joker's features fill the natural curve of the rind without spilling over the top, bottom, or stem.
Tools You Will Need
You do not need a professional kit, but the right tools make a noticeable difference.
- A sharp serrated pumpkin saw or a craft knife with replaceable blades
- A small linoleum cutter or pottery loop tool for detail work
- A large spoon or ice cream scoop for gutting
- A printed pumpkin stencil joker template, taped to the pumpkin
- Transfer paper, or a pin and chalk dust for poking the design
- A wet towel for wiping the rind as you work
- A flameless LED candle or a real tea light in a sturdy holder
Step-by-Step: Carving Your Joker Pumpkin
1. Prep the Pumpkin
Wash the pumpkin in warm soapy water and dry it completely. Cutting a clean lid at a 45-degree angle (rather than straight across) keeps the top from falling inward as the pumpkin dries. Scoop out all seeds and stringy pulp, then scrape the inner wall down to about one inch thick. The thinner the wall, the more light will pass through your Joker's face.
2. Attach the Stencil
Tape your printed pumpkin stencil joker firmly to the front of the pumpkin, smoothing out any wrinkles. If the template wraps around the curve, slice the paper along the natural ridges of the pumpkin so it lays flat. Use transfer paper underneath to mark the rind, or poke every line with a pin to create a dotted outline you can follow with a knife.
3. Carve the Big Shapes First
Start with the negative space, the large dark areas like the eye sockets, the open mouth, and the hair silhouette. Cut these out fully so light pours through. For a strong Joker effect, the mouth should be the most open area on the pumpkin. Save the small details like teeth, pupils, and scar lines for after the major sections are removed.
4. Add Detail Work
Switch to a fine serrated saw or linoleum cutter for teeth, wrinkles, and the iconic Glasgow-smile scars. Scrape, do not cut, on areas that should look shaded. Scraping just the orange outer skin lets a soft amber glow come through without punching a hole. This trick is what separates an amateur carving from a polished pumpkin stencil joker jack-o'-lantern.
5. Preserve and Light
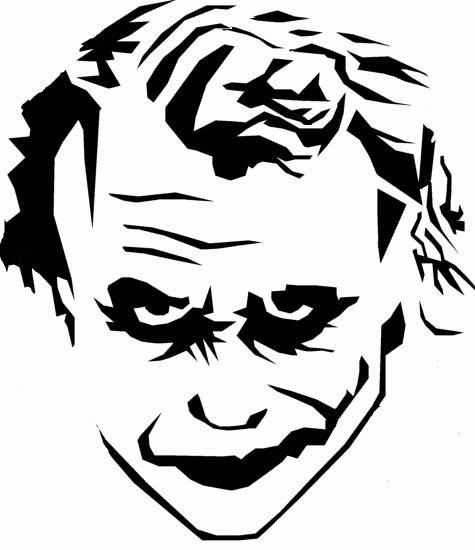
Rub the cut edges with a thin layer of petroleum jelly to slow browning and keep them looking fresh. Place a flameless LED inside for safety, especially if kids or pets will be near the porch. For a more cinematic flicker, dim a real candle inside a glass jar so the wind does not blow it out.
Design Variations to Try
Once you have the basic Joker carved once, it is easy to remix the design year after year.
Comic Book Joker
Keep the lines bold and graphic, then paint the rind with green face paint around the stencil before carving. Add purple accents near the hairline to echo the classic costume. This version photographs beautifully and reads as comic art even before the sun goes down.
Movie-Inspired Joker
Lean into a specific actor's take. A Heath Ledger stencil emphasizes smudged scars and a chaotic asymmetrical mouth. A Joaquin Phoenix stencil uses softer, sadder lines and a defined pointed hairline. A Jared Leto or Barry Keoghan design leans into tattoo details, which can be hinted at with thin scraped lines.
Kid-Friendly Joker
If the pumpkin is for a child or a daytime harvest event, soften the grin by rounding the teeth and shortening the scars. Skip the dramatic shading and stick to clean cut-out shapes. The result still reads as a Joker but without any horror-movie intensity.
Display and Photography Tips
Where you place the pumpkin changes how the Joker looks at night. Set him at eye level or slightly below so the light from inside hits the cheekbones and throws deeper shadows in the eye sockets. Avoid streetlights shining directly on the face, since they will wash out the contrast between carved and uncarved areas.
For photos, turn off the porch light and use a long exposure on your phone or camera. The flicker of a candle inside the mouth creates the unsettling, alive feeling that makes a Joker pumpkin memorable. A fog machine at the base of the pumpkin adds atmosphere without damaging the carving.
Common Mistakes to Avoid
- Skipping the wall-thinning step. A thick inner wall blocks light and makes even the best stencil look dim.
- Carving too small. Miniature features disappear at porch-viewing distance. Scale your stencil up.
- Forgetting airflow. A candle needs a small vent hole in the back or lid so it does not suffocate and smoke up the face.
- Waiting until Halloween night to carve. Pumpkins start to shrivel within a few days. Carve three to five days before for peak appearance.
Frequently Asked Questions
What is the easiest pumpkin stencil joker design for beginners?
Look for a template labeled beginner or simple, with chunky teeth, an open mouth, and minimal hair detail. These usually carve in under 45 minutes and look great even if your lines are a little wavy.
Can I paint my pumpkin instead of carving a Joker stencil?
Absolutely. Print the stencil, trace it with chalk or a washable marker, then fill in the design with acrylic paint. Painted pumpkins last longer outside and are a good option for apartments that ban open flames or sharp tools.
How long will a carved Joker pumpkin last?
Expect three to seven days before noticeable shriveling, depending on weather. Cool nights and the petroleum jelly trick will buy you an extra day or two. If you want it to last the whole Halloween week, carve closer to October 28 or 29.
Final Thoughts
A pumpkin stencil joker carving is one of the most rewarding Halloween projects you can take on. The combination of a recognizable character, bold graphic shapes, and dramatic lighting makes it a crowd-pleaser on any porch. Take your time prepping the pumpkin, match your stencil to your skill level, and do not skip the detail work that gives the Joker his signature grin. With a little patience and a flickering light inside, your jack-o'-lantern will look like it stepped right out of Gotham and onto your front step.